 The Apple TV 2 is a great device if you want to stream content from from Apple, Netflix, YouTube or your own iTunes library. But if you’re anything like me–you already have a huge collection of movies and TV shows that were ripped into a slew of formats that don’t play nice with the Apple TV.
So we convert. I’ve found a relatively painless workflow that will allow you to convert your media from just about anything (AVI and MKV included) to Apple friendly formats, and tag it with metadata so you can enjoy film description, movie posters, episode information and more on your Apple TV (just as if you bought it on iTunes).
Conversion
The first, and most time consuming step, is to run all your media through conversion software. I’m using two pieces of software. Video Monkey and Handbrake.
The benefit of Video Monkey is that it has a queue interface, so you can drag a selection of videos into the app, choose your options, hit start and grab a coffee.
Handbrake is a little smarter than Video Monkey and it allows you to preserve 5.1 audio tracks if your vidoes have them. It also has a queue, but its cumbersome and you have to add each file individually.
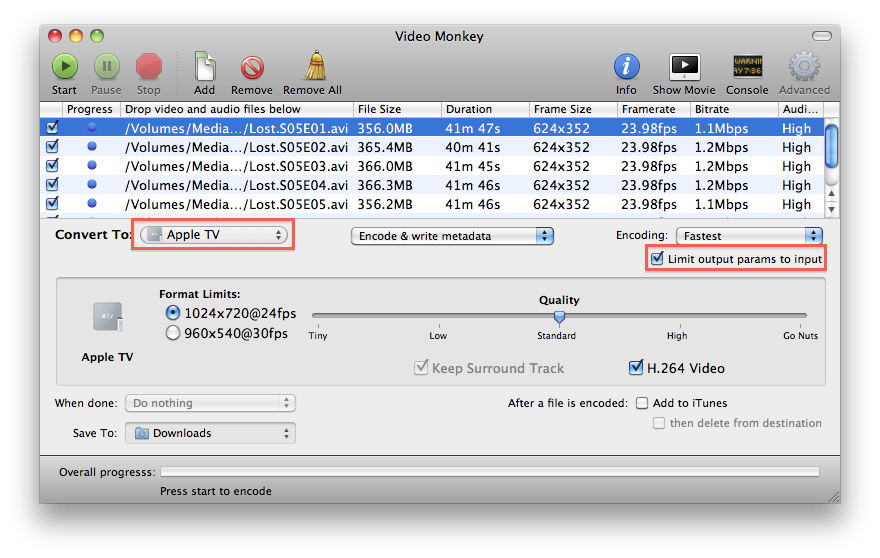
If you’re using Video Monkey:
- Drag in your videos
- Select the Apple TV preset
- Check “Limit output params to input” (doesn’t work with MKV’s)
- Default quality is good enough for me, but adjust to your fancy
- Hit Start (it could take minutes or hours depending on your machine)
If you’re using Handbrake:
- Use the Source window to choose one file (or drag the file from the Finder into the Source window)
- Select the Apple TV preset from the presets pain on the right (might have to “Toggle Presets”)
- Handbrake automatically limits output parameters to input, and this does work with MKV’s
- Default quality is good enough for me, but adjust to your liking
- Hit Start (it could take minutes or hours depending on your machine)
- To add another file to the queue, click Source from the toolbar and repeat the process, clicking “Add to Queue” instead of Start at step 5
I recommend trying it with one file first to make sure quality is what you expected.
My next post covers tagging your converted media so it displays nicely in iTunes/Apple TV.
